码丁实验室,一站式儿童编程学习产品,寻地方代理合作共赢,微信联系:leon121393608。
Servo Controller (伺服控制器)
说明
- 展示通过ROS使用Arduino和serial控制R/C 伺服
- 这可以用来实现控制一个释放机制,一个廉价的机器人手臂,一个ROS驱动的双足机器人,任何地方,你需要的廉价的致动器
- 这里代码提供一个简单示例控制hobby伺服器
硬件
- arduino
- hobby r/c servo
- 包含一个齿轮箱和电机控制电子
- 非常便宜
- 通过发送1-2毫秒宽度每20毫秒方波脉冲控制
- 通常移动伺服臂0-180度
- 有多种尺寸、扭矩和角精度
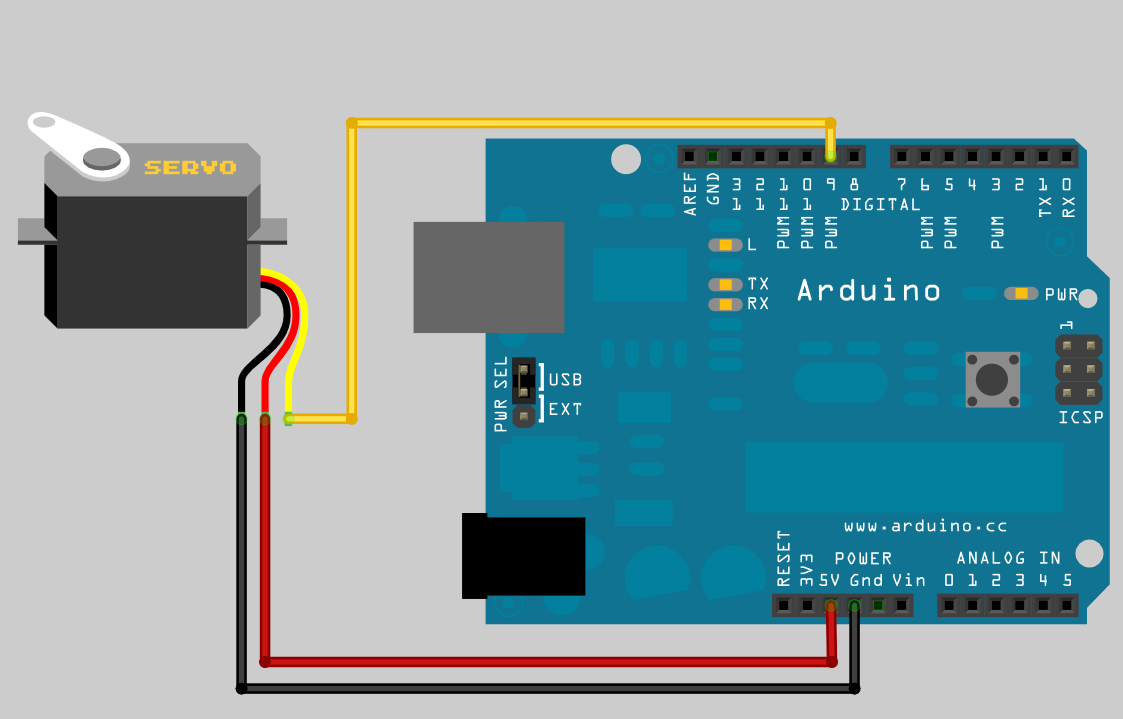
连接图

代码
/*
 * rosserial Servo Control Example
 *
 * This sketch demonstrates the control of hobby R/C servos
 * using ROS and the arduiono
 *
 * For the full tutorial write up, visit
 * www.ros.org/wiki/rosserial_arduino_demos
 *
 * For more information on the Arduino Servo Library
 * Checkout :
 * http://www.arduino.cc/en/Reference/Servo
 */

#if defined(ARDUINO) && ARDUINO >= 100
  #include "Arduino.h"
#else
  #include <WProgram.h>
#endif

#include <Servo.h>
#include <ros.h>
#include <std_msgs/UInt16.h>

ros::NodeHandle  nh;

Servo servo;

void servo_cb( const std_msgs::UInt16& cmd_msg){
  servo.write(cmd_msg.data); //set servo angle, should be from 0-180
  digitalWrite(13, HIGH-digitalRead(13));  //toggle led
}


ros::Subscriber<std_msgs::UInt16> sub("servo", servo_cb);

void setup(){
  pinMode(13, OUTPUT);

  nh.initNode();
  nh.subscribe(sub);

  servo.attach(9); //attach it to pin 9
}

void loop(){
  nh.spinOnce();
  delay(1);
}
解释:
- 本代码使用一个Arduino Servo库,它处理所有的低电平控制,以产生和维护伺服脉冲。
- 你所有的代码需要做的是指定引脚的伺服连接,然后写入到伺服对象的角度。
- 伺服库使用Arduino的内置定时器中断来产生正确的脉冲。
- 在这个例子中,我们只能控制一个伺服,但相同的库可以用来控制多达12个伺服系统在大多数Arduino板和48对arduino mega。
- 关键地方是,增加全局Servo对象,连接到正确的Arduino引脚,在每个伺服订阅主题,调用回调函数,写入一个新的角度到Servo对象。
测试
- 新终端打开
$ roscore
- 新终端打开
$ rosrun rosserial_python serial_node.py _port:=/dev/ttyUSB0
- 新终端打开,发送servo主题,角度在 0-180 之间。
$ rostopic pub servo std_msgs/UInt16 <angle>

