码丁实验室,一站式儿童编程学习产品,寻地方代理合作共赢,微信联系:leon121393608。
这几天有点忙,都没时间翻译,今天刚好有时间,突然忽发奇想,万一我发现原文错了,到底我的翻译要跟着错呢?还是翻译改正,原文继续错?还是索性把原文一起改了?
EV3: Lesson 2 – First EV3 Python Program: “Hello World”
EV3:第二课 – 第一个Python程序:“Hello World”
2.1 Open the IDE and Create a New Project
2.1 打开 IDE 并新建一个项目
Open Visual Studio 2017 and create a new project:
打开 Visual Studio 2017 并且新增一个项目:
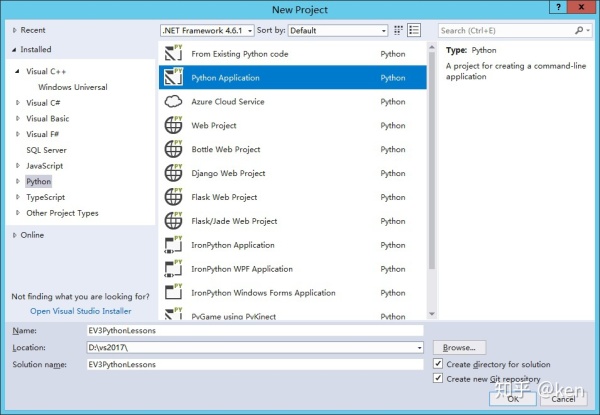
Figure 2.1
To start it as simple as possible, we choose the “Python Application” as the project type, the Name of the Project is: “EV3PythonLessons”, choose an appropriate folder to create this project, we use “D:vs2017″ in this example.
You must choose “Create directory for solution” as this is a new project.
You may want to choose “Create new Git repository” if there are more than 1 person in your programming team, or you want to better protect your programs by version control.
Now, click “OK” to create this project.
使用最简单的方法开始,我们选择的项目类型是“Python Application”,我们用“EV3PythonLessons”作为项目名称,你可以选择任意的文件夹去创建这个项目,在这里,我们使用了“D:vs2017”这个文件夹。
由于这是一个全新的项目,因此你必须要选择“Create directory for solution”。
如果你的编程团队有超过一个人一起编写这个程序,你可能会想选择“Create new Git repository”,这样,你们就可以使用版本控制的功能一起编写/修改程序了。
现在,按“OK”去创建这个项目。
2.2 First Program
2.2 第一个程序
An empty python program will be created for you, namely “EV3PythonLessons.py”, we DO NOT need this! So, close this program by clicking the “X”.
一个新的 python 程序 “EV3PythonLessons.py”会自动被创建,我们不需要这个程序,所以,按“X”把这个程序关掉。
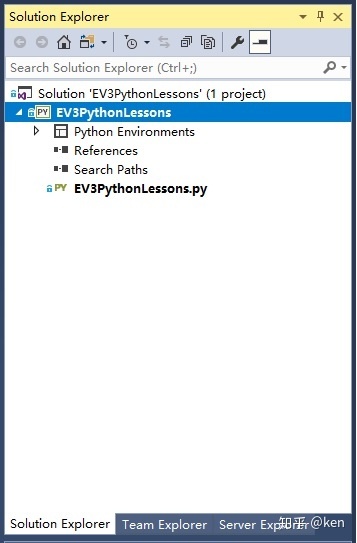
Figure 2.2
Now Right click the “EV3PythonLessons”, select “Add”, then select “New Item”:
在屏幕右边项目名称“EV3PythonLessons”的位置,按鼠标右键并选择“Add”,然后选择“New Item”:
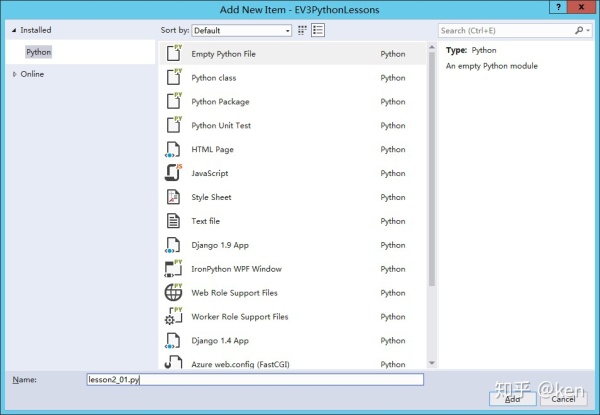
Figure 2.3
Create an Empty Python File with Name: “lesson2_01.py” and click “Add”.
创建一个空白的 Python 档案,并且命名为:”lesson2_01.py”,然后按“Add”。
Copy and paste the following codes into the program:
把以下的程序拷贝到新建的程序里:
#!/usr/bin/env python3
from ev3dev.ev3 import *
from time import sleep, time
import traceback


try:
    lcd = Screen()

    lcd.clear()

    intX = 10

    intY = 5

    lcd.draw.text((intX, intY), 'Hello World')

    lcd.draw.rectangle((20, 20, 158, 40), fill = 'black')

    lcd.draw.text((25, 25), 'Hello World', fill = 'white')

    lcd.update()

    sleep(10)
except:
    # If there is any error, it will be stored in the log file in the same directory
    logtime = str(time())
    f=open("log" + logtime + ".txt",'a')
    traceback.print_exc(file=f)
    f.flush()
    f.close()
Or, you can download the program from the following location:
你也可以在以下的链接下载这个程序:
http://www.zephan.top/ev3pythonlessons/lesson2/lesson2_01.py
Now we are going to explain this program in detail:
现在我们会详细的解释这个程序:
#!/usr/bin/env python3
- ask the EV3 to run this program in python3
- 这句的意思是让 EV3 使用 python3 去编译并运行这个程序
from ev3dev.ev3 import *
- loads all the “APIs” required to control EV3 using python programs
- 加载所有有关于 EV3 的“API”
from time import sleep, time
- loads time related functions
- 加载和时间有关的API
import traceback
- in case any error in the program, we use the system provided traceback api to log any program error
- 万一出现了程序错误,我们使用系统提供的 traceback api 去记录这些错误
try and except
- if there is any error in the “try” region, a log file will be created in the same directory, you can then open this log file in the WinSCP program to see what’s wrong in your program.
- 如果在 “try”区域里出现了任何程序错误,有一个 log 档案就会被创建在同一个文件夹下,任何你可以使用 WinSCP 这个程序去查看到底程序错在哪里。
lcd = Screen()
- declare an object that can control the EV3 LCD screen
- 声明一个叫 lcd 的对象,使用这个对象的属性和方法,就可以控制 EV3 的屏幕。
lcd.clear()
- clear the LCD screen
- 清除 EV3 的屏幕内容
lcd.draw.text((intX, intY), ‘Hello World’)
- the EV3 screen consist of 178 width x 128 height dots.
- start drawing the text “Hello World” at column intX(which is 10), row intY(which is 5).
- EV3 的屏幕宽 178 点,高 128 点。
- 在 X (横)为 10, Y (竖)为 5 的位置,画出“Hello World”这些文字
lcd.update()
- Update the LCD screen and display the content.
- 更新并显示屏幕内容。
sleep(10)
- The program wait for 10 seconds
- 程序停顿(或假死,就是什么都不做)10秒钟。
the others are self explained.
其他的程式句子比较简单,句子本身就解释了自己的意思。
2.3 Upload the program
2.3 上传程序
2.3.1 Connect your EV3 brick with the USB cable:
2.3.1 使用 USB 线连接 EV3:
- In your EV3 Brick, select “Wireless and Networks” and press the “Middle” button
- Select “All Network Connections” and press the “Middle” button
- Select “Wired” and press the “Middle” button
- Select “Connect automatically” and press the “Middle” button
- Select “Connect” and press the “Middle” button
Now you should see the state is “Configuring” and wait for around 30 seconds until the state turns into “Connected”, then the IP address of the EV3 brick will be shown at the top left corner of the EV3′s LCD screen.
- 在你的 EV3 主机(开机后),选择“Wireless and Networks” 然后按中间键(译者按:EV3 有 6 个按键,中间键也就是【确认键】的意思)。
- 选择“All Network Connections”然后按【确认键】。
- 选择 “Wired”然后按【确认键】。
- 选择 “Connect automatically”然后按【确认键】。
- 选择 “Connect”然后按【确认键】。
现在,你应该可以看到网络的连接状态是“Configuring”,大概 30 秒后,状态会变成“Connected”,然后 EV3 的 IP 地址就会显示在屏幕的左上方。
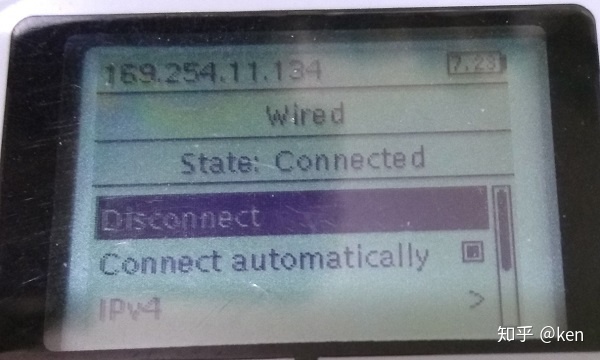
Figure 2.4
You can test the connection by opening the command prompt and “Ping http://xxx.xxx.xxx.xxx” in which xxx is the IP address shown.
你可以打开电脑的 Command Prompt (命令行)并且使用 “Ping http://xxx.xxx.xxx.xxx” 去测试 EV3 和 电脑的连接是否成功,这些 xxx 就是 EV3 的 IP 地址。
2.3.2 Open the WinSCP program
2.3.2 打开 WinSCP 程序 (在电脑里打开,用来上传程序到 EV3)
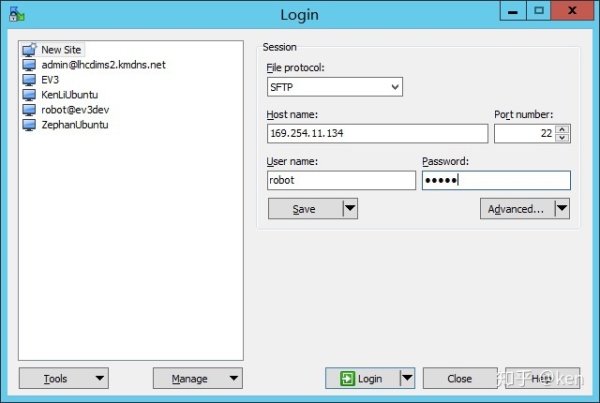
Figure 2.5
Choose “New Site”, input the IP address in the “Host Name”, and:
User name: robot
Password: maker
Then click “Login”.
Click “Yes” if you are asked whether you want to connect to an unknown server.
选择 “New Site”,在“Host Name”输入 EV3 的 IP 地址:
User name 是 robot
Password 是 maker
然后按“Login”。
然后你会看见一个问题,问你要不要连接一个未知服务器,按“Yes”。
2.3.3 One Time Configuration of WinSCP
2.3.3 WinSCP 的一次性配置
In order to make the python programs “Executable” inside the EV3 Brick and we DO NOT want to change the programs to Executable Mode EVERYTIME when we upload the programs, we need to do a ONE TIME configuration so that all programs uploaded will be executable.
要让上传到 EV3 的 Python 程序 “可执行” (译者按:由于已安装 EV3DEV 的操作系统是一个 Linux 的系统,上传 Linux 系统的程序,如果不特别设置,都是不能执行的!),我们不想每次都要改变程序的权限来让它可以被执行,所以我们需要做一个一次性的设置。
To do so:
- select “Options” in the WinSCP,
- select “Preferences”,
- select “Transfer”
- select “Text”
- click “Edit”
- check “Automatically select this preset when”, and inside the Username mask, enter “robot”
- click the “…” under the “Set permissions” and check as follow:
要做这个设置:
- 选择 WinSCP 菜单的“Options”
- 选择 “Preferences”
- 选择 “Transfer”
- 选择 “Text”
- 选择 “Edit”
- 打钩 “Automatically select this preset when”,并且在 “Username mask” 里输入 robot
- 在 “Set permissions”下面按一下 “…”,并按下图选择:
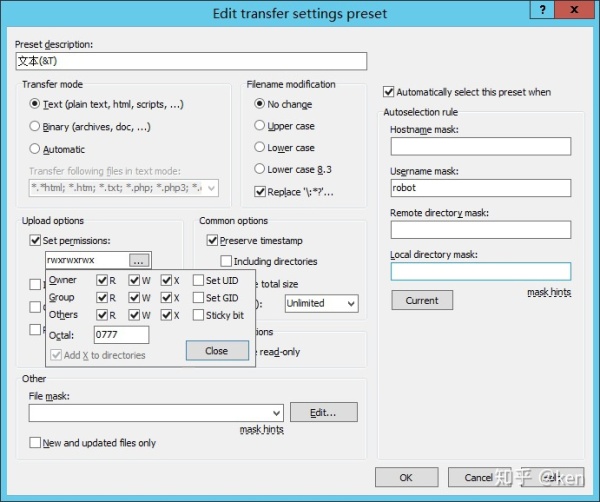
Figure 2.6
Then click “OK” to save the changes, click “OK” again to leave the “Preferences”.
然后按 “OK”存储,并再按一次“OK”离开 Preferences 菜单。
The left hand side represents files in your PC, the right hand side represents files in your EV3 brick.
WinSCP 程序里的左边显示了你电脑里的文档,右边显示了你 EV3 里面的文档。
On the left hand side, go to the folder that store the python programs:
在左边,打开存储 Python 程序的文件夹:
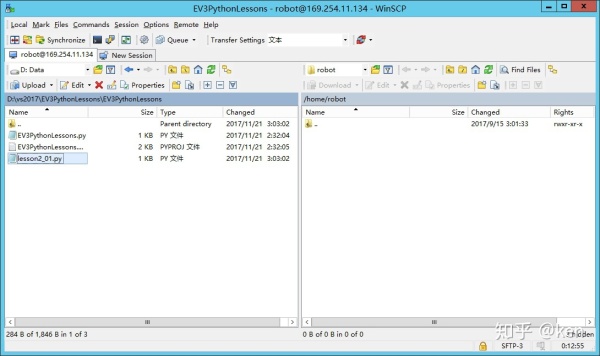
Figure 2.7
Select the program that you want to upload, in this case, “lesson2_01.py”, click “Upload”.
Click “OK” to perform the upload.
You should see the file is shown on the right hand side of the WinSCP.
选择你想上传的文档,这里我们选择“lesson2_01.py”,然后按“Upload”。
选择“OK”开始上传。
你现在应该可以看到上传的文档在右边了。
2.4 Running the Program
2.4 运行程序
- Press the “Upper Left Corner” button on the EV3 until you see the Main Menu of your EV3.
- Select “File Browser” and press the “Middle” button.
- Select “lesson2_01.py” and press the “Middle” button to run the program.
- 在 EV3 上,按几下右上角的【退出键】直到你看见 EV3 的主菜单
- 选择“File Browser”并且按 【确认键】。
- 选择 “lesson2_01.py”并且按 【确认键】。
After a few seonds loading the program, you should see:
几秒钟后,你应该可以看到:
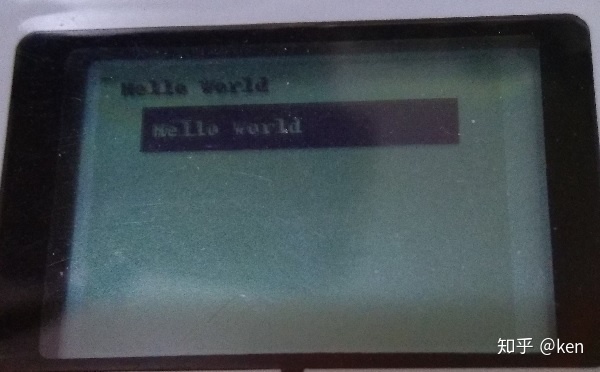
Figure 2.8
Then after 10 seconds, the program quits itself.
然后 10 秒钟后,程序会自己退出来。
In our next lesson, we’ll learn some basic Python Syntax.
在下一课,我们会学习更多 Python 的语法。
始发于知乎专栏:ken

