码丁实验室,一站式儿童编程学习产品,寻地方代理合作共赢,微信联系:leon121393608。
译者按:使用 ev3dev Linux 系统并用 Python 编程的人数比例很低,好像这一课这样写 Python 编程的就更少了,你会发现程序的重用率会大大的提高!
EV3: Lesson 4 – Python Modules
EV3:第 4 课 – Python 模块
4.1 Separate Functions, Main Program and Global Variables
4.1 分开的函数,主程序,和全局变量
In our last lesson, we learned how to use functions to perform repeated jobs. However, if the main program contains too many functions, the program size will become too large to be maintained. So, we’ll need some technique to separate those functions with the main program.
在我们的上一课,我们学习了如何使用函数去执行一些重复的工作。但是,如果主程序里有太多的函数,程序会变得太大而难以维护。所以,我们需要一些技巧去分开主程序和函数。
Those python program files that stored functions are called “Python Modules”.
我们叫那些储存函数的档案为【Python 模块】。
In order to share variables between different python programs and modules, we’ll also need to put the global variables to a seperate python module. (Note: global variables can only be used within the same python program)
为了可以让一些变量可以同时被主程序及函数使用,我们也需要把这些全局变量放到一个分开的 Python 模块去声明。(要注意的是,前面课程提到的全局变量,是只能在同一个程序档案里使用,这一课教的方法,让全局变量可以跨档案使用)
The following python programs and modules perform the same job that is described in lesson 3:
下面的几个 Python 程序,会执行和第 3 课一样的工作:
To acheive this purpose, let’s create an empty python file called “g.py” that stores all required global variables:
要达到这个目的,让我们创建一个空的 Python 程序,并命名为“g.py”,这个模块储存里所有需要的全局变量:
global intResult
intResult = 0
http://www.zephan.top/ev3pythonlessons/lesson4/g.py
Then, we put all the functions into another python file called “fun.py”
然后,我们把所有的函数放进去另外一个 Python 模块“fun.py”
# import g.py so that the variables defined in it can be used in this module
import g

def funAddWithReturn(intNo1, intNo2):
    intTemp = intNo1 + intNo2
    return intTemp

def funAddWithoutReturn(intNo1, intNo2):
    # Please note that intResult has been changed to g.intResult
    g.intResult = intNo1 + intNo2

def funAddWithoutReturnWrong(intNo1, intNo2):
    intResult = intNo1 + intNo2
http://www.zephan.top/ev3pythonlessons/lesson4/fun.py
Then, we copy other contents from lesson3_03.py to lesson4_01.py with some modifications:
然后,我们把其他程序内容从 lesson3_03.py 拷贝到 lesson4_01.py 里,并稍微修改:
#!/usr/bin/env python3
from ev3dev.ev3 import *
from time import sleep, time
import traceback
# import g.py and fun.py
import g
import fun

try:
    #The main program starts here
    lcd = Screen()

    lcd.clear()

    # Declare local variable
    intA = 3
    intB = 5

    # The answer for the following statement is 8
    # Important Note **********  "fun." is added before the function name, as it is defined there!!!  **********

    lcd.draw.text((5, 5), "intA + intB = " + str(fun.funAddWithReturn(intA, intB)))

    # The answer for the following statement is 0, pls. note that intResult has been changed to g.intResult
    fun.funAddWithoutReturnWrong(intA, intB)
    lcd.draw.text((5, 20), "intA + intB = " + str(g.intResult))

    # The answer for the following statement is 8, pls. note that intResult has been changed to g.intResult
    fun.funAddWithoutReturn(intA, intB)
    lcd.draw.text((5, 35), "intA + intB = " + str(g.intResult))

    lcd.update()

    sleep(10)
except:
    # If there is any error, it will be stored in the log file in the same directory
    logtime = str(time())
    f=open("log" + logtime + ".txt",'a')
    traceback.print_exc(file=f)
    f.flush()
    f.close()
http://www.zephan.top/ev3pythonlessons/lesson4/lesson4_01.py
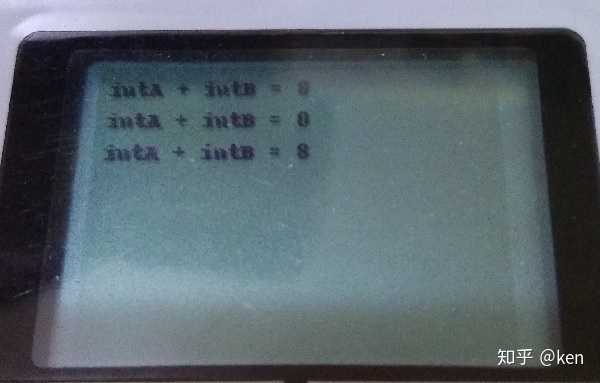
Upload the above 3 programs and run lesson4_01.py in the EV3 brick, you’ll see exactly the same result as in lesson 3:
把上面的 3 个程序上传到 EV3,并且运行主程序 lesson4_01.py,你会发现屏幕输出会和第 3 课的一模一样:

Figure 4.1
In our next lesson, we’ll learn how to control the buttons on the EV3 brick.
在下一课,我们会学习如何控制 EV3 主机上面的按键。
始发于知乎专栏:ken

