码丁实验室,一站式儿童编程学习产品,寻地方代理合作共赢,微信联系:leon121393608。
Using SPI to read a Barometric Pressure Sensor(用SPI来读取气压传感器)
- 这个例子展示了如何使用SPI(串行外设接口)通讯库从SCP1000气压传感器读取数据。更多关于SPI的信息,请点击这里。
硬件要求
- Arduino or Genuino board
- SCP1000 气压传感器分接板(Breakout Board)
- 连接线
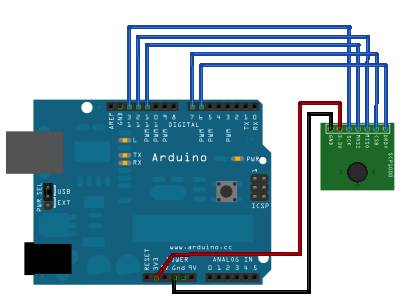
电路

图由 Fritzing 软件绘制
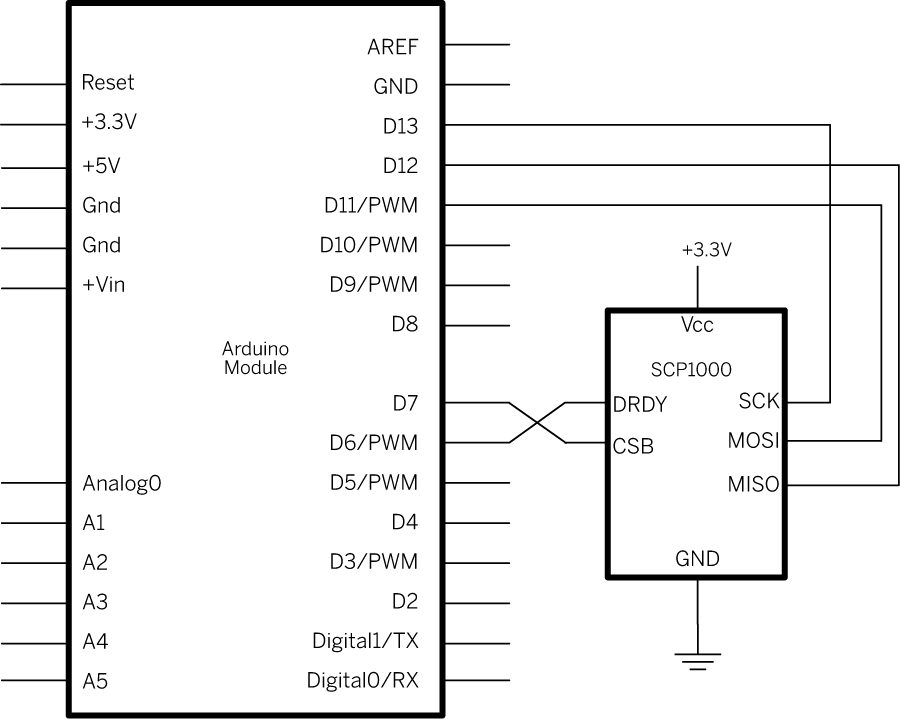
原理图

SCP1000气压传感器可以读取空气压力和温度数值,并且通过SPI接口报告他们。更多控制寄存器的详细信息,参考SCP1000数据手册。
样例代码
-
下面的代码开始就在setup()设置SCP1000的配置寄存器。在主循环中,它设置了传感器在高分辨率模式下读取,这意味着它将返回一个19位值的压力读取值,和16位的温度读取值。实际读数(摄氏度)是除以20的16位结果。
-
然后它读取温度的两个字节。一旦它得到了温度,它在两部分读取压力。首先它读取最高的三位,然后较低的16位。它结合了这两组数成为一个单一的长整数,通过位移高位,然后用按位或将它们与低16位组合起来。实际压力(帕斯卡)是除以4的19位结果。
/*
 SCP1000 Barometric Pressure Sensor Display

 Shows the output of a Barometric Pressure Sensor on a
 Uses the SPI library. For details on the sensor, see:

http://www.sparkfun.com/commerce/product_info.php?products_id=8161


http://www.vti.fi/en/support/obsolete_products/pressure_sensors/

 This sketch adapted from Nathan Seidle's SCP1000 example for PIC:

http://www.sparkfun.com/datasheets/Sensors/SCP1000-Testing.zip

 Circuit:
 SCP1000 sensor attached to pins 6, 7, 10 - 13:
 DRDY: pin 6
 CSB: pin 7
 MOSI: pin 11
 MISO: pin 12
 SCK: pin 13

 created 31 July 2010
 modified 14 August 2010
 by Tom Igoe
 */

// the sensor communicates using SPI, so include the library:
#include <SPI.h>

//Sensor's memory register addresses:
const int PRESSURE = 0x1F;      //3 most significant bits of pressure
const int PRESSURE_LSB = 0x20;  //16 least significant bits of pressure
const int TEMPERATURE = 0x21;   //16 bit temperature reading
const byte READ = 0b11111100;     // SCP1000's read command
const byte WRITE = 0b00000010;   // SCP1000's write command

// pins used for the connection with the sensor
// the other you need are controlled by the SPI library):
const int dataReadyPin = 6;
const int chipSelectPin = 7;

void setup() {
  Serial.begin(9600);

  // start the SPI library:
  SPI.begin();

  // initalize the  data ready and chip select pins:
  pinMode(dataReadyPin, INPUT);
  pinMode(chipSelectPin, OUTPUT);

  //Configure SCP1000 for low noise configuration:
  writeRegister(0x02, 0x2D);
  writeRegister(0x01, 0x03);
  writeRegister(0x03, 0x02);
  // give the sensor time to set up:
  delay(100);
}

void loop() {
  //Select High Resolution Mode
  writeRegister(0x03, 0x0A);

  // don't do anything until the data ready pin is high:
  if (digitalRead(dataReadyPin) == HIGH) {
    //Read the temperature data
    int tempData = readRegister(0x21, 2);

    // convert the temperature to celsius and display it:
    float realTemp = (float)tempData / 20.0;
    Serial.print("Temp[C]=");
    Serial.print(realTemp);


    //Read the pressure data highest 3 bits:
    byte  pressure_data_high = readRegister(0x1F, 1);
    pressure_data_high &= 0b00000111; //you only needs bits 2 to 0

    //Read the pressure data lower 16 bits:
    unsigned int pressure_data_low = readRegister(0x20, 2);
    //combine the two parts into one 19-bit number:
    long pressure = ((pressure_data_high << 16) | pressure_data_low) / 4;

    // display the temperature:
    Serial.println("tPressure [Pa]=" + String(pressure));
  }
}

//Read from or write to register from the SCP1000:
unsigned int readRegister(byte thisRegister, int bytesToRead) {
  byte inByte = 0;           // incoming byte from the SPI
  unsigned int result = 0;   // result to return
  Serial.print(thisRegister, BIN);
  Serial.print("t");
  // SCP1000 expects the register name in the upper 6 bits
  // of the byte. So shift the bits left by two bits:
  thisRegister = thisRegister << 2;
  // now combine the address and the command into one byte
  byte dataToSend = thisRegister & READ;
  Serial.println(thisRegister, BIN);
  // take the chip select low to select the device:
  digitalWrite(chipSelectPin, LOW);
  // send the device the register you want to read:
  SPI.transfer(dataToSend);
  // send a value of 0 to read the first byte returned:
  result = SPI.transfer(0x00);
  // decrement the number of bytes left to read:
  bytesToRead--;
  // if you still have another byte to read:
  if (bytesToRead > 0) {
    // shift the first byte left, then get the second byte:
    result = result << 8;
    inByte = SPI.transfer(0x00);
    // combine the byte you just got with the previous one:
    result = result | inByte;
    // decrement the number of bytes left to read:
    bytesToRead--;
  }
  // take the chip select high to de-select:
  digitalWrite(chipSelectPin, HIGH);
  // return the result:
  return (result);
}


//Sends a write command to SCP1000

void writeRegister(byte thisRegister, byte thisValue) {

  // SCP1000 expects the register address in the upper 6 bits
  // of the byte. So shift the bits left by two bits:
  thisRegister = thisRegister << 2;
  // now combine the register address and the command into one byte:
  byte dataToSend = thisRegister | WRITE;

  // take the chip select low to select the device:
  digitalWrite(chipSelectPin, LOW);

  SPI.transfer(dataToSend); //Send register location
  SPI.transfer(thisValue);  //Send value to record into register

  // take the chip select high to de-select:
  digitalWrite(chipSelectPin, HIGH);
}
[Get Code]
更多
- Arduino SPI LIbrary – SPI库的参考网页
- DigitalPotControl – 通过SPI控制一个数字电位计

