码丁实验室,一站式儿童编程学习产品,寻地方代理合作共赢,微信联系:leon121393608。
数组
- 在for循环的变量示范了怎么用一个数组。一个数组是一个含多部分的变量。 如果你把一个变量理解为一个装数据的杯,你可以把一个数组理解为制冰格。它就像一系列的粘在一起的杯,上面装着一些最大的数值。
- for循环示范了怎样点亮连接到Arduino或Genuino开发板上pin2到pin7的一系列的LED灯,这些引脚需要连续标记数字,而LED灯需要按顺序打开。
- 这个例子示范怎样顺序打开一些引脚,这些引脚的序号是不连续而且不按次序。为了实现这个目的,你可以把这些引脚序号放到一个数组里,然后在循环里重申完这个数组。
- 这个例子充分利用了通过220 ohm电阻连接在pin2到pin7的6个LED灯,就像在for循环里。然而,这里LED灯的顺序由它们在数组里的顺序确定,而不是他们的物理顺序。
- 这个把引脚放到数组的方式很方便。你不必把这些引脚一个接一个排好顺序,或者同一个顺序。你可以重新排列数组,按任何你想要的顺序。
硬件要求
- Arduino or Genuino 开发板
- 6 LEDs
- 6 220 ohm 电阻
- 连接线
- 面包板
电路
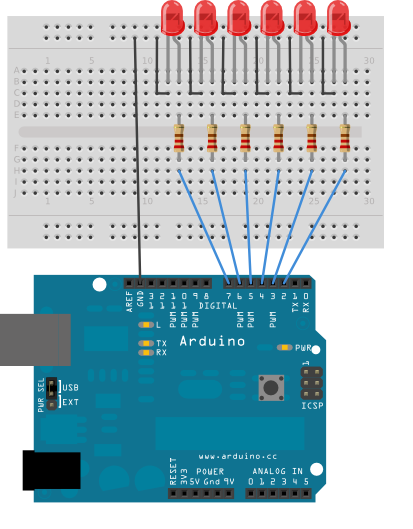
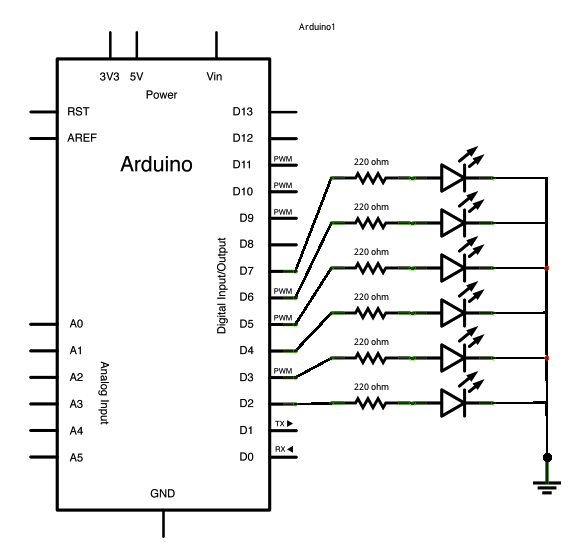
通过220 ohm电阻串联,连接6个LED灯到数字引脚pin2-pin7上。

图片用Fritzing绘制。
原理图

样例代码
/*
  Arrays

 Demonstrates the use of  an array to hold pin numbers
 in order to iterate over the pins in a sequence.
 Lights multiple LEDs in sequence, then in reverse.

 Unlike the For Loop tutorial, where the pins have to be
 contiguous, here the pins can be in any random order.

 The circuit:
 * LEDs from pins 2 through 7 to ground

 created 2006
 by David A. Mellis
 modified 30 Aug 2011
 by Tom Igoe

This example code is in the public domain.

http://www.arduino.cc/en/Tutorial/Array

 */

int timer = 100;           // The higher the number, the slower the timing.
int ledPins[] = {
  2, 7, 4, 6, 5, 3
};       // an array of pin numbers to which LEDs are attached
int pinCount = 6;           // the number of pins (i.e. the length of the array)

void setup() {
  // the array elements are numbered from 0 to (pinCount - 1).
  // use a for loop to initialize each pin as an output:
  for (int thisPin = 0; thisPin < pinCount; thisPin++) {
    pinMode(ledPins[thisPin], OUTPUT);
  }
}

void loop() {
  // loop from the lowest pin to the highest:
  for (int thisPin = 0; thisPin < pinCount; thisPin++) {
    // turn the pin on:
    digitalWrite(ledPins[thisPin], HIGH);
    delay(timer);
    // turn the pin off:
    digitalWrite(ledPins[thisPin], LOW);

  }

  // loop from the highest pin to the lowest:
  for (int thisPin = pinCount - 1; thisPin >= 0; thisPin--) {
    // turn the pin on:
    digitalWrite(ledPins[thisPin], HIGH);
    delay(timer);
    // turn the pin off:
    digitalWrite(ledPins[thisPin], LOW);
  }
}
更多
- pinMode()
- digitalWrite()
- for()
- delay()
- 数组:一个在For循环的变量举例了怎样使用一个数组。
- IfStatementConditional:通过for循环来控制多个LED灯
- If声明条件:使用一个‘if 声明’,通过改变输入条件来改变输出条件
- Switch Case:怎样在非连续的数值里选择。
- Switch Case 2:第二个switch-case的例子,展示怎样根据在串口收到的字符来采取不同的行为
- While 声明条件:当一个按键被读取,怎样用一个while循环来校准一个传感器。

