
码丁实验室,一站式儿童编程学习产品,寻地方代理合作共赢,微信联系:leon121393608。
我是潘,曾经是个工程师。这是“Arduino 公开课” 系列的入门教程。ENC28J60是一款非常便宜的网络模块,本课我们介绍该模块的使用,Ping 通你的Arduino。有任何疑问请在评论区提出,我会逐一回答。
接入网络后Arduino 就成为了 IoT(物联网,Internet of Things)的一部分。这片小小的 MCU 不再是一个个体。通过它,我们与被控设备就能进行实时的数据交互。
比如,通过网络可以让控制中心,监控温室里面的温度、湿度、土壤盐度、气压等数据,然后根据这些信息,实时对温室调控。
当然,Arduino 自身也能根据数据,对温室的设备进行反馈,只要设定好相应的程序即可。不过,大规模有成千上百万个温室时,就无法做到统一调度。因此 Arduino 在小型设备中,可以当作一个具有简单收集和反馈能力的大脑,而在大规模应用中,它更适合,扮演节点的角色。
然而,上面的都是题外话了,在后面设计人工智能的可能,我们将详细展开来讨论。
Arduino 官方推荐 W5100 模块,这个模块虽然功能强大,同时,内置了SD模块方便数据存储,但其价格也相当高。所以我们还是选择性能稳定、库同样丰富完善的 ENC28J60 模块,价格 10~20 元之间。
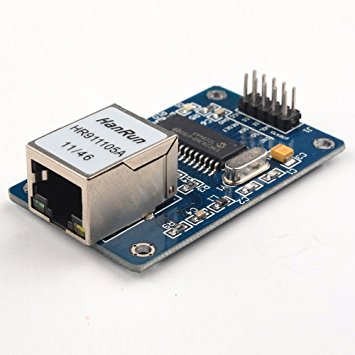
官方Ethernet 库是为W5100开发的,所以我们要下载针对 ENC28J60 的库,建议使用 JeeLabs Café 的 Ethercard 库,JeeLabs Café 已将它在 Github 上开源,国内的朋友可以在ethercard-master,另外,库函数的官方文档在这里。安装方式跟之前一样,解压放到库文件夹中即可。按照一般的 SPI 接线方式来连接即可,但这里必须接 RESET :
MOSI,D11;
MISO,D12;
SCK,D13;
SS/CS,寻址端默认为 D10;
RESET,RESET,重启;
VCC,3V3;
GND,GND;
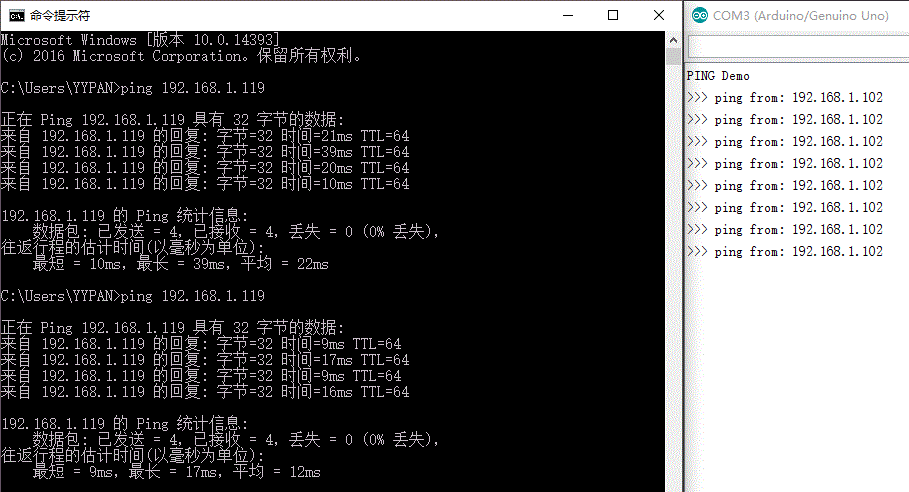
我们第一个程序就是从PC上,Ping 通我们Arduino。即从计算机发送一个ping的请求,经过网络到达Arduino 设备,然后设备反馈一个“收到了”的信息:
|
1
2
3
4
5
6
7
8
9
10
11
12
13
14
15
16
17
18
19
20
21
22
23
24
25
26
27
|
/*
作者:Ardui.Co
效果:回应 PC 的 ping 请求
版本:1.0
更新时间:2017年6月3日
*/
#include <EtherCard.h>
staticbytemymac[]={0×74,0×69,0×69,0x2D,0×30,0×31};//设置MAC地址
staticbytemyip[]={192,168,1,119};//设置静态IP地址
byteEthernet::buffer[700];//设置缓冲区大小
//收到 Ping 请求时,打印发出请求的设备IP地址
staticvoidgotPinged(byte*ptr){
ether.printIp(“>>> ping from: “,ptr);//printIP() 作用为在串口打印请求设备 IP 地址
}
voidsetup(){
Serial.begin(57600);
Serial.println(“PING Demo”);
ether.registerPingCallback(gotPinged);//收到Ping请求时,调用 gotPinged 函数
if(ether.begin(sizeof Ethernet::buffer,mymac)==0)//begin()初始化网络接口,设置缓冲区和MAC地址
Serial.println(“Failed to access Ethernet controller”);
if(!ether.staticSetup(myip))//设置 Arduino 的IP、网关、DNS等信息
Serial.println(“Failed to set IP address”);
}
voidloop(){
wordlen=ether.packetReceive();//接收数据包
wordpos=ether.packetLoop(len);//相应收到的Ping请求
}
|
各种方法似乎很复杂,但理解了其含义,用起来就很简单:
|
1
2
3
|
staticbytemymac[]={0×74,0×69,0×69,0x2D,0×30,0×31};//设置MAC地址
staticbytemyip[]={192,168,1,119};//设置静态IP地址
byteEthernet::buffer[700];//设置缓冲区大小
|
注释已经讲的很清楚了,但如果路由/服务器开启了DHCP的话,还可以通过让 Arduino 自动获得 IP 地址,其实,在现实的大部分应用中,我们只需声明 MAC 地址和缓冲区的大小。
|
1
2
3
|
staticvoidgotPinged(byte*ptr){
ether.printIp(“>>> ping from: “,ptr);//printIP() 作用为在串口打印请求设备 IP 地址
}
|
声明了一个函数,作用是在串口打印请求设备的 IP 地址,byte* 是一个指针,指向缓冲区存储 IP 地址的地址。注意这个函数要在 void setup() 中,通过 registerPingCallback(function) 方法来调用。
显而易见,Ping Callback 的含义是,当收到 Ping 请求时,调用另外一个函数;这个方法在寄存器中,所以不用放在 void loop(),它也会一直监听。
|
1
2
3
4
|
if(ether.begin(sizeof Ethernet::buffer,mymac)==0)//begin()初始化网络接口,设置缓冲区和MAC地址
Serial.println(“Failed to access Ethernet controller”);
if(!ether.staticSetup(myip))//设置 Arduino 的IP、网关、DNS等信息
Serial.println(“Failed to set IP address”);
|
begin() 作用为初始化网络接口,设置缓冲区和MAC地址,如果反馈“0”,表明硬件连接故障,“1”说明链接成功。staticSetup() 数据结构如下:
|
1
2
3
4
5
6
|
staticSetup(
constuint8_t *my_ip,
constuint8_t *gw_ip=0,
constuint8_t *dns_ip=0,
constuint8_t *mask=0
)
|
如果网关、DNS、mask 不设置,则默认为0。
|
1
|
len=ether.packetReceive()
|
作用是监听收到的数据包,并将数据包赋值给 len。
|
1
|
ether.packetLoop()
|
对 Ping 等数据包信息作出响应。
将程序载入 Arduino 发送 Ping 请求时,IDE 会显示发送请求主机的 IP 地址:
现在我们已经成功将 Arduino 接入网络了!不过,在智能家居应用中,不可能每次都手动设置设备的IP 地址,更希望它能够自动设置。其实,方式很简单,使用 dhcpSetup() 方法,自动获取DHCP服务器的信息即可:
|
1
2
3
4
5
6
7
8
9
10
11
12
13
14
15
16
17
18
19
20
21
22
23
24
25
26
27
28
29
30
31
|
/*
作者:Ardui.Co
效果:自动获取 IP 并回应 PC 的 ping 请求
版本:1.0
更新时间:2017年6月3日
*/
#include <EtherCard.h>
staticbytemymac[]={0×74,0×69,0×69,0x2D,0×30,0×31};//设置MAC地址
byteEthernet::buffer[700];//设置缓冲区大小
//收到 Ping 请求时,打印发出请求的设备IP地址
staticvoidgotPinged(byte*ptr){
ether.printIp(“>>> ping from: “,ptr);//printIP() 作用为在串口打印请求设备 IP 地址
}
voidsetup(){
Serial.begin(57600);
Serial.println(“PING Demo”);
ether.registerPingCallback(gotPinged);//收到Ping请求时,调用 gotPinged 函数
if(ether.begin(sizeof Ethernet::buffer,mymac)==0)//begin()初始化网络接口,设置缓冲区和MAC地址
Serial.println(“Failed to access Ethernet controller”);
if(!ether.dhcpSetup())//自动获取DHCP服务器的信息
Serial.println(“Failed to get configuration from DHCP”);
else
Serial.println(“DHCP configuration done”);
ether.printIp(“IP Address:\t”,ether.myip);
ether.printIp(“Netmask:\t”,ether.dnsip);
ether.printIp(“Gateway:\t”,ether.gwip);
}
voidloop(){
wordlen=ether.packetReceive();//接收数据包
wordpos=ether.packetLoop(len);//相应收到的Ping请求
}
|
登陆路由器界面,从 DHCP 查看主机连接列表, 会发现一个 “Arduino-ENC28j6” 的设备。