
码丁实验室,一站式儿童编程学习产品,寻地方代理合作共赢,微信联系:leon121393608。
我是潘,曾经是个工程师。这是 “Arduino 公开课” 系列的入门教程。上节课介绍 让 Arduino 成为 Web 服务器,现在为其加入交互控制的功能,形象来说,即通过浏览器控制板载 LED。同时介绍如何主动抓取命令,以突破无法访问内网的限制。有任何疑问请在评论区提出,我会逐一回答。
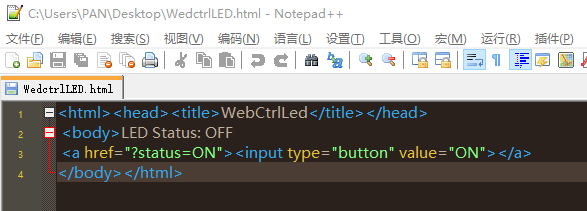
通过 Web 界面控制控制 LED 可能是最简单的交互形式了。如果你具有 HTML 的编程基础,立马会想到实现控制的形式就是表单反馈:

检查一下源代码:
|
1
|
<ahref=“?status=ON”><input type=“button”value=“ON”></a>
|
Web 服务器执行,按下按钮(“<input>” 是一个按钮)时, “LED Status: ” 的显示状态就会改变:
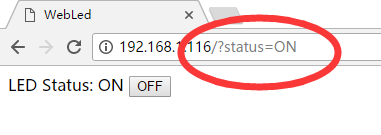
/?status=ON,打开LED,
/?status=OFF,关闭LED。
“value” 是按钮的值,按下后,以“GET”方式(不是很安全,实际应用中建议用 “POST”,后话),发送到目标网页上(这里是href=”/”,即当前页面;”?status=XXX”是这个网页后缀),然后被服务器当作变量读取。按下按钮后,完整的路径如下:
但注意,这里改变的是网页显示的内容(ON/OFF),而不是 LED 的实际状态。为此,程序设计的思路是,通过检索网页的变化,去调整 LED 的状态。
完整的程序:
|
1
2
3
4
5
6
7
8
9
10
11
12
13
14
15
16
17
18
19
20
21
22
23
24
25
26
27
28
29
30
31
32
33
34
35
36
37
38
39
40
41
42
43
44
45
46
47
48
49
50
51
52
53
54
55
56
57
58
59
60
61
62
63
64
65
66
|
/*
作者:Ardui.Co
效果:Web LED开关
版本:1.0
更新时间:2017年6月18日
*/
#include <EtherCard.h>
staticbytemymac[]={0xDD,0xDD,0xDD,0×00,0×00,0×01};
staticbytemyip[]={192,168,1,116};//设置静态IP
byteEthernet::buffer[700];
constintledPin=2;//板载 LED 即 D13 被 SPI 引线占据因此必须设置其他引脚
booleanledStatus;
char*on=“ON”;//以指针形式设置字符串变量,性能很重要!
char*off=“OFF”;
char*statusLabel;//设置指针变量,存储LED状态
char*buttonLabel;//设置指针变量,存储按钮状态
voidsetup(){
Serial.begin(57600);
Serial.println(“WebLed Demo”);
if(!ether.begin(sizeof Ethernet::buffer,mymac,10))
Serial.println(“Failed to access Ethernet controller”);
else
Serial.println(“Ethernet controller initialized”);
if(!ether.staticSetup(myip))
Serial.println(“Failed to set IP address”);
Serial.println();
pinMode(ledPin,OUTPUT);
digitalWrite(ledPin,LOW);//默认输出低电平
ledStatus=false;
}
voidloop(){
wordlen=ether.packetReceive();
wordpos=ether.packetLoop(len);
if(pos){
if(strstr((char*)Ethernet::buffer+pos,“GET /?status=ON”)!=0){//strstr()方法检查网页的缓存,状态是否为ON,OFF同理
Serial.println(“Received ON command”);
ledStatus=true;
}
if(strstr((char*)Ethernet::buffer+pos,“GET /?status=OFF”)!=0){
Serial.println(“Received OFF command”);
ledStatus=false;
}
if(ledStatus){
digitalWrite(ledPin,HIGH);
statusLabel=on;
buttonLabel=off;
}else{
digitalWrite(ledPin,LOW);
statusLabel=off;
buttonLabel=on;
}
BufferFiller bfill=ether.tcpOffset();
bfill.emit_p(PSTR(“HTTP/1.0 200 OK\r\n”
“Content-Type: text/html\r\nPragma: no-cache\r\n\r\n”
“<html><head><title>WebLed</title></head>”
“<body>LED Status: $S “
“<a href=\”/?status=$S\”><input type=\”button\” value=\”$S\”></a>”
“</body></html>”
),statusLabel,buttonLabel,buttonLabel);
ether.httpServerReply(bfill.position());
}
}
|
跟之前的程序相比,这个程序很有点意思。
|
1
2
3
4
|
char*on=“ON”;
char*off=“OFF”;
char*statusLabel;
char*buttonLabel;
|
我们定义了4个指针变量,前两个赋值“ON”和“OFF”。但为什么用指针变量呢?因为可以减少值之间的传递,提高程序的效率。
|
1
2
3
|
pinMode(ledPin,OUTPUT);
digitalWrite(ledPin,LOW);
ledStatus=false;
|
将 LED 和它的状态初始化为 OFF。
|
1
2
3
4
5
6
7
8
9
|
if(pos){
if(strstr((char*)Ethernet::buffer+pos,“GET /?status=ON”)!=0){
Serial.println(“Received ON command”);
ledStatus=true;
}
if(strstr((char*)Ethernet::buffer+pos,“GET /?status=OFF”)!=0){
Serial.println(“Received OFF command”);
ledStatus=false;
}
|
核心在这:strstr(str1, str2) 方法。Arduino 能够直接调用大部分的 C 的方法,strstr() 的含义是在 str1 上,寻找 str2,一旦找到返回 str2 开始的地址(指针),如果找不到反馈 “0”。如果找到 “/?status=ON” 就让 LED 亮起来,反之亦然。
|
1
2
3
4
5
6
7
8
9
|
if(ledStatus){
digitalWrite(ledPin,HIGH);
statusLabel=on;
buttonLabel=off;
}else{
digitalWrite(ledPin,LOW);
statusLabel=off;
buttonLabel=on;
}
|
同时,通过改变 statusLabel、buttonLabel 的值,调整网页的显示状态。
|
1
2
3
4
5
6
7
|
bfill.emit_p(PSTR(“HTTP/1.0 200 OK\r\n”
“Content-Type: text/html\r\nPragma: no-cache\r\n\r\n”
“<html><head><title>WebLed</title></head>”
“<body>LED Status: $S “
“<a href=\”/?status=$S\”><input type=\”button\” value=\”$S\”></a>”
“</body></html>”
),statusLabel,buttonLabel,buttonLabel);
|
$S 是占位符,一共有3个,按顺序由 statusLabel,buttonLabel, buttonLabel 来替换。
为了方便展示,我选择了在手机浏览器上操作:
理解网页操作的整个过程很重要:
用户输入网址 ——> 浏览器向服务器发起请求 ——> 服务器响应并返回初始状态数据 ——> 浏览器显示网页 ——> 用户点击操作 ——> 浏览器向服务器发送数据 ——> 服务器执行 if(pos) 判断 ——> 向浏览器返回数据 ——> 浏览器刷新页面