码丁实验室,一站式儿童编程学习产品,寻地方代理合作共赢,微信联系:leon121393608。
1.5.1 引言1.5.2 地图构建1.5.3 可视化工具rviz1.5.4 ROS 服务1.5.5 载入地图练习题
1.5.1 引言
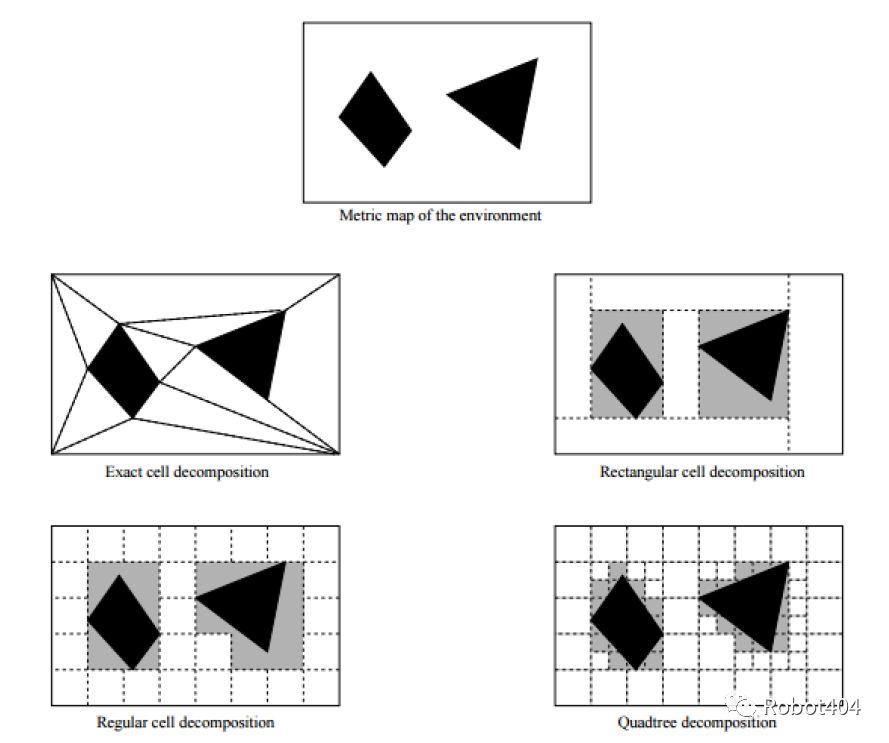
构建地图是移动机器人的基本问题之一,地图使得机器人能够高效地执行定位、路径规划和活动规划(activity planning)等等任务;存在不同的方法来创建环境地图,如单元分解方法、占有网格图等。单元分解方法(Cellular Decomposition),为路径规划分解可用空间,可分为精确分解和近似分解,前者完全覆盖自由空间,例如梯形分解、草地图;后者表示导航所需的部分空闲空间,例如网格地图、四叉树和Voronoi图。
占有网格图(Occupancy Grid Map, OGM),将环境映射为单元网格,通常单元大小为5厘米到50厘米不等;以概率的形式表示每个单元的占据情况;以-1表示某个单元的占据状态未知,未知区域通常指机器人传感器未能探测到的区域。如图2所示,白色像素表示该区域没有被占据,黑色像素表示该区域被占据,灰色像素表示该区域占据状态未知。
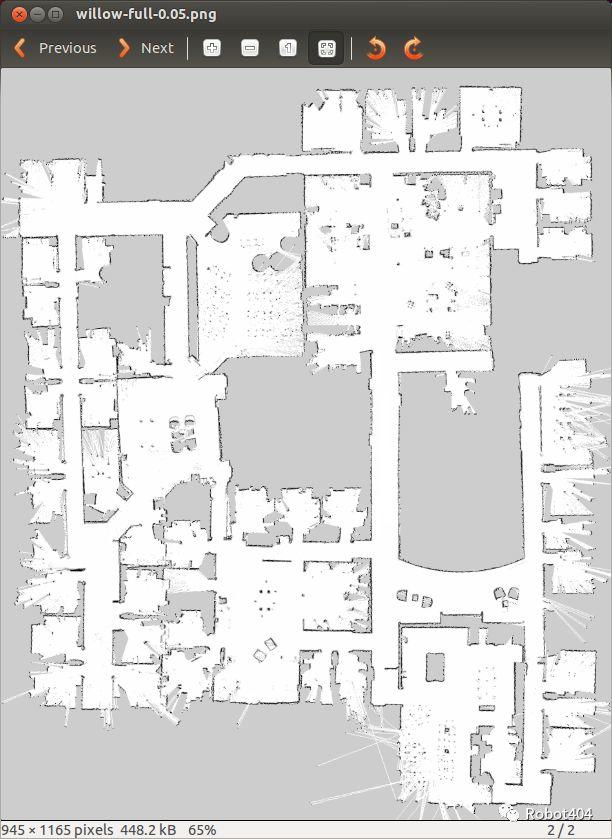
占有网格图的优点是表示方便、处理速度快,缺点是不精确、浪费空间,所谓不精确是指如果一个物体落入网格单元的一部分,则整个单元被标记为占用。
1.5.2 地图构建
在ROS中地图文件存储为图像,支持各种常见格式(如PNG,JPG和PGM等),虽然可以使用彩色图像,但在被ROS解译之前,它们会被转换为灰度图像;与每个地图相关联的是一个YAML文件,包含地图的相关信息。
(1)地图的 YAML 文件示例:
image: map.pgm
resolution: 0.050000
origin: [-100.000000, -100.000000, 0.000000]
negate: 0
occupied_thresh: 0.65
free_thresh: 0.196
其中,resolution表示地图的分辨率,米/像素;origin表示左下像素的2D姿位姿(x,y,yaw);occupied_thresh表示占用概率大于该阈值的像素是完全占用的;free_thresh表示占用概率小于该阈值的像素是完全未被占用的。
(2)编辑Map文件
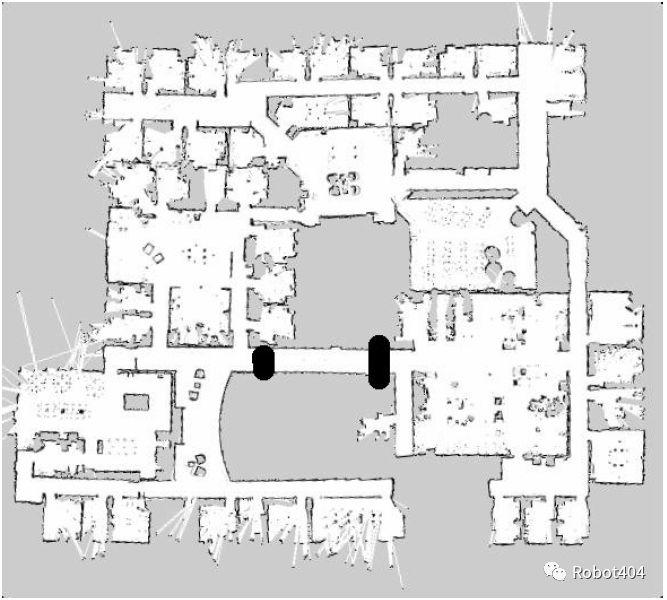
由于将地图保存为图像文件,我们可以用喜欢的图像编辑器进行编辑;因此,我们能够编辑根据传感器数据创建的任何地图,包括删除不应存在的内容、添加虚假障碍物以影响路径规划等。例如,在不希望机器人通过的走廊上画一条线,能够阻止机器人规划路径通过地图的某些区域,如图3所示。
(3)FastSLAM
同时定位与地图构建(Simultaneous localization and mapping, SLAM)是机器人用于在未知环境中构建地图的同时跟踪其当前位置的技术。SLAM是一个类似先有鸡还是先有蛋的问题,因为精确定位需要无偏地图,而构建该地图需要准确的位姿估计。
早期的典型工作FastSLAM基于粒子滤波器,将概率分布表示为占据状态空间的一组离散粒子,主要步骤:从随机分布的粒子开始,将粒子的预测值与实测值进行比较,根据状态估计与测量值的一致程度,为每个粒子分配一个权重,根据权重创建新分布,从先前分布中随机绘制粒子。
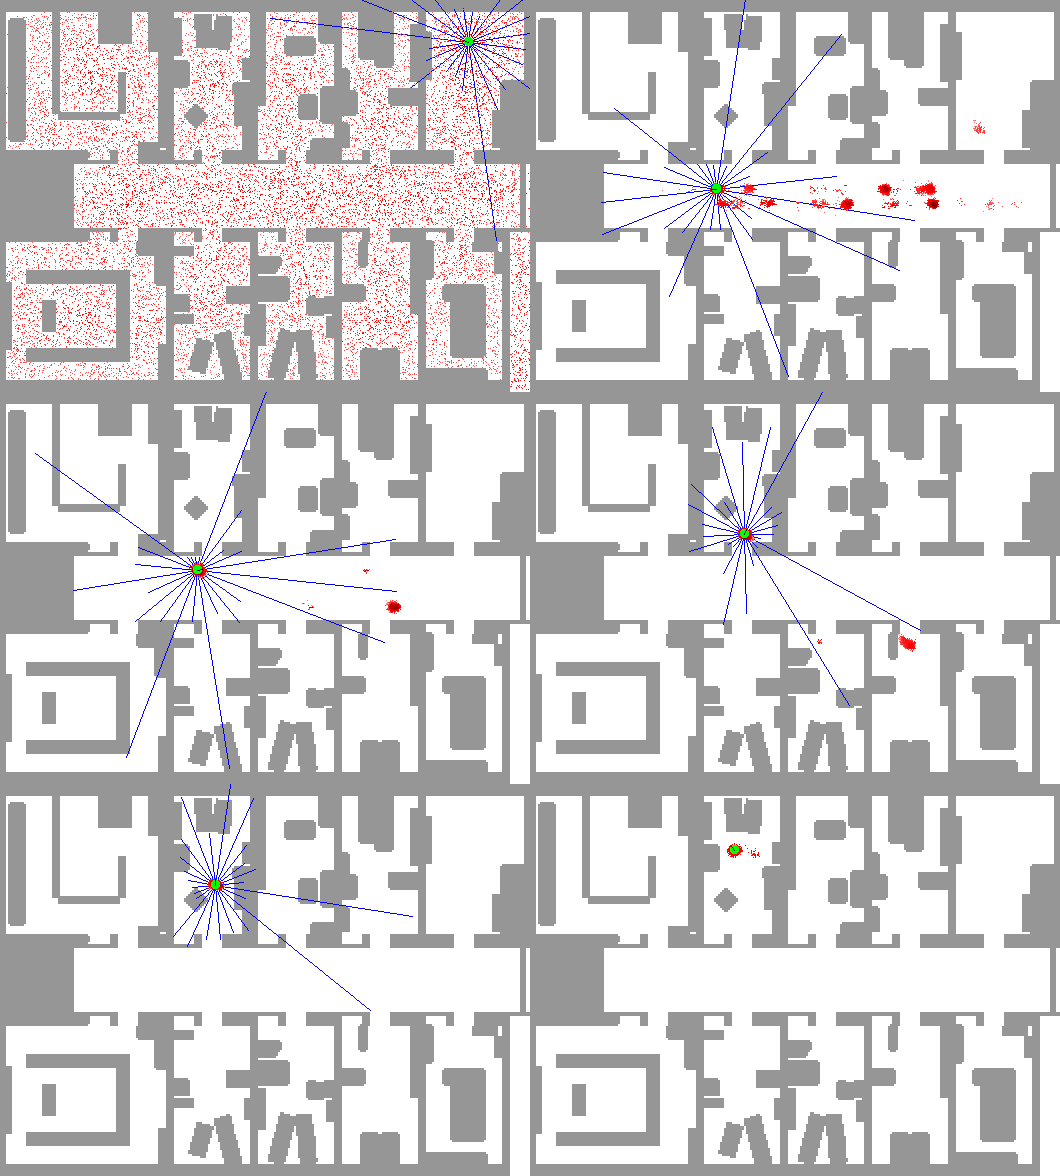
在ROS中,gmapping包提供基于激光的SLAM,gmapping使用FastSLAM算法,其中ROS节点名为slam_gmapping,需要激光扫描和里程计用于创建2D占有网格图,能够在在机器人移动时更新地图状态。
gmapping不是ROS Kinetic默认安装的一部分,因此需要通过如下命令安装:
sudo apt-get update
sudo apt-get install ros-kinetic-slam-gmapping
如何运行gmapping?
首先,安装turtlebot_gazebo:
sudo apt-get install ros-kinetic-turtlebot-gazebo
启动带有turtlebot的Gazebo:
roslaunch turtlebot_gazebo turtlebot_world.launch
在新的终端窗口,通过如下命令启动gmapping:
rosrun gmapping slam_gmapping

通过如下命令移动Gazebo中的机器人:
roslaunch turtlebot_teleop keyboard_teleop.launch
通过如下命令检查地图是否被发布到/map主题:
rostopic echo /map -n1
其中,消息类型是nav_msgs/OccupancyGrid。将空间的占据概率表示为整数,其中,0表示完全空旷,100表示完全占据,而-1作为特殊值表示未知占据状态。
参考链接:http://wiki.ros.org/gmapping
参考视频:ROS with gmapping video
1.5.3 可视化工具rviz
(1)rviz是什么
rviz 是一款ROS的3D可视化工具,可让我们从机器人的角度看世界,通过如下命令打开可视化工具rviz:
rosrun rviz rviz
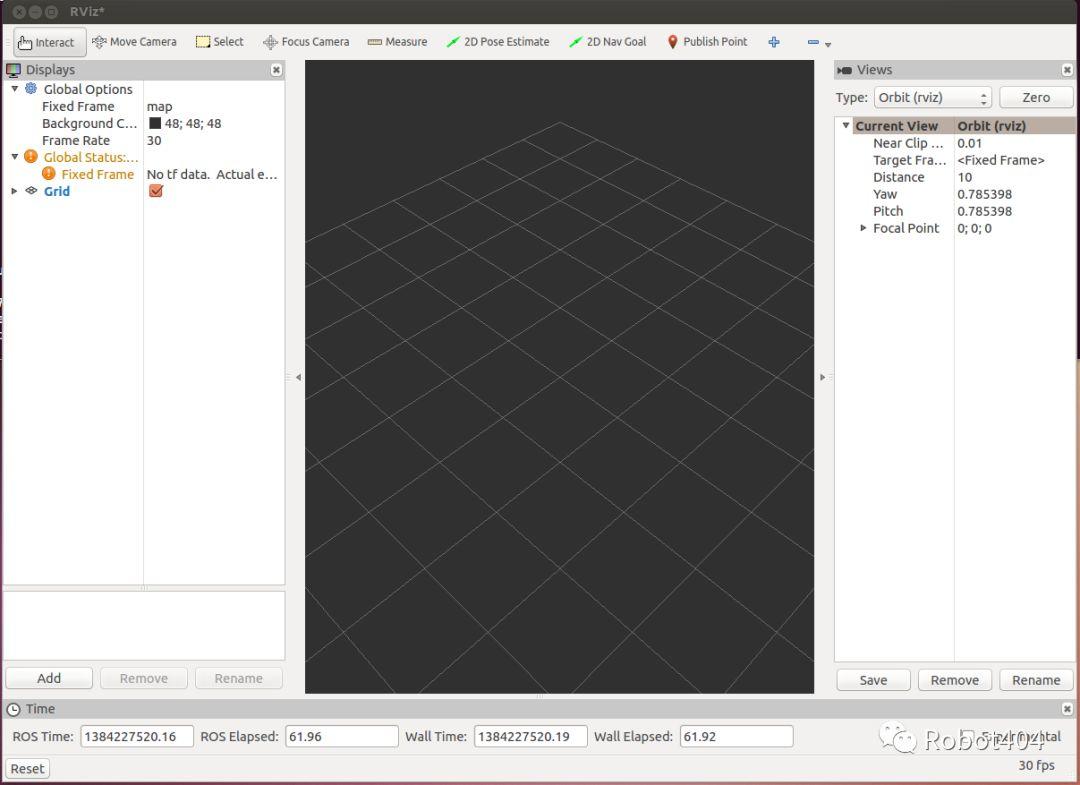
rviz常用操作命令,使用鼠标右键或滚轮放大或缩小,使用鼠标左键平移(shift-单击)或旋转(单击)。
第一次打开rviz时,我们将看到一个空的3D视图,见图5。左侧是“Displays”区域,包含世界中显示在中间的不同元素的列表,在“Displays”区域下方的“Add”按钮,用于添加更多元素。
| Description | Messages Used | |
|---|---|---|
| Aexs | Displays a set of Axes | |
| Effort | Show the effort being put into each revolute joint of a robot | sensor_msgs/JointStates |
| Camera | Creates a new rendering window from the perspective of a camera, and overlays the image on top of it. | sensor_msgs/Imagesensor_msgs/CameraInfo |
| Grid | Displays a 2D or 3D grid along a plane | |
| Grid Cells | Draws cells from a grid, usually obstacles from a costmap from the navigation stack. | nav_msgs/GridCells |
| Image | Creates a new rendering window with an Image. | sensor_msgs/Image |
| LaserScan | Shows data from a laser scan, with different options for rendering modes, accumulation, etc. | sensor_msgs/LaserScan |
| Map | Displays a map on the ground plane. | nav_msgs/OccupancyGrid |
| Markers | Allows programmers to display arbitrary primitive shapes through a topic | visualization_msgs/Markervisualization_msgs/MarkerArray |
| Path | Shows a path from the navigation stack. | nav_msgs/Path |
| Pose | Draws a pose as either an arrow or axes | geometry_msgs/PoseStamped |
| Point Cloud(2) | Shows data from a point cloud, with different options for rendering modes, accumulation, etc. | sensor_msgs/PointCloudsensor_msgs/PointCloud2 |
| Odometry | Accumulates odometry poses from over time. | nav_msgs/Odometry |
| Range | Displays cones representing range measurements from sonar or IR range sensors. | sensor_msgs/Range |
| RobotModel | Shows a visual representation of a robot in the correct pose (as defined by the current TF transforms). | |
| TF | Displays the tf transform hierarchy. |
(2)rviz with TurtleBot
通过如下命令安装turtlebot_rviz:
sudo apt install ros-kinetic-turtlebot-rviz-launchers
通过如下命令,启动rviz已配置为可视化机器人及其传感器的输出:
roslaunch turtlebot_rviz_launchers view_robot.launch
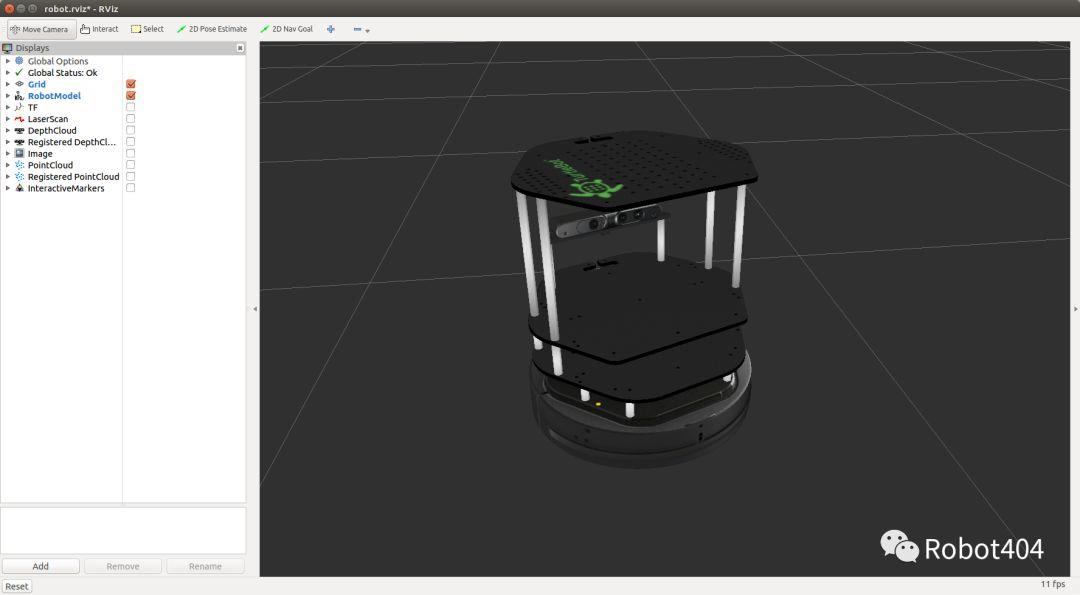
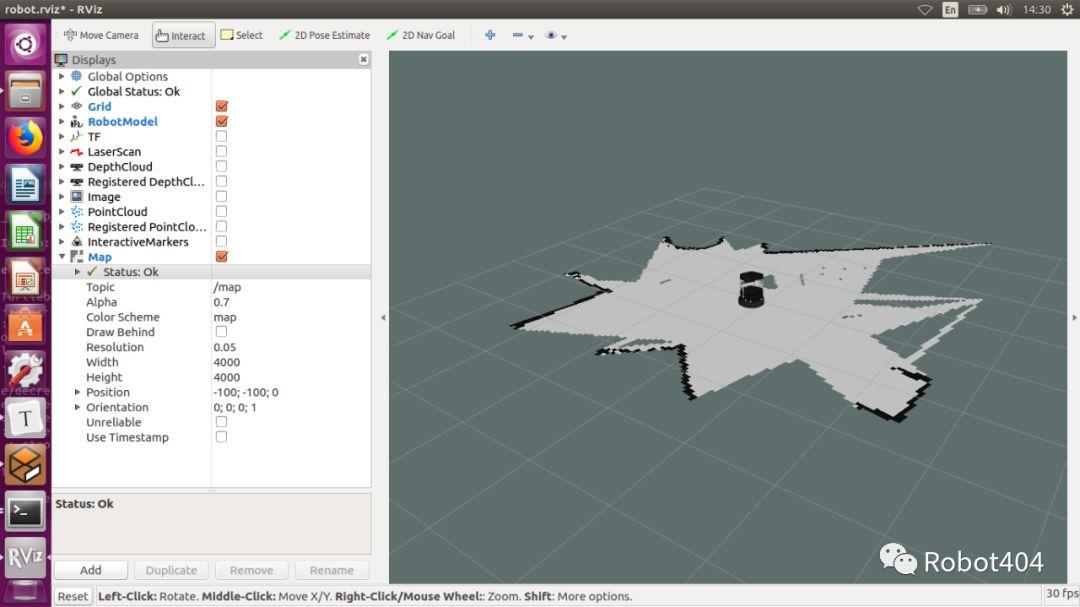
添加地图显示,将主题设置为/map,在rviz中能够看到地图构建进度,见图7。
(3)加载和保存配置
通过从rviz的菜单中选择“File”->“Save Config”来保存rviz设置到.rviz文件,根据如下命令可以使用保存的配置启动rviz:
$ rosrun rviz rviz -d my_config.rviz
(4)gmapping启动文件
<launch>
   <!-- Run Gazebo with turtlebot -->
   <include file="$(find turtlebot_gazebo)/launch/turtlebot_world.launch"/>

   <!-- Run gmapping -->
   <node name="gmapping" pkg="gmapping" type="slam_gmapping"/>

   <!-- Open rviz -->
   <include file="$(find turtlebot_rviz_launchers)/launch/view_robot.launch"/>
</launch>
(5)加载已有地图
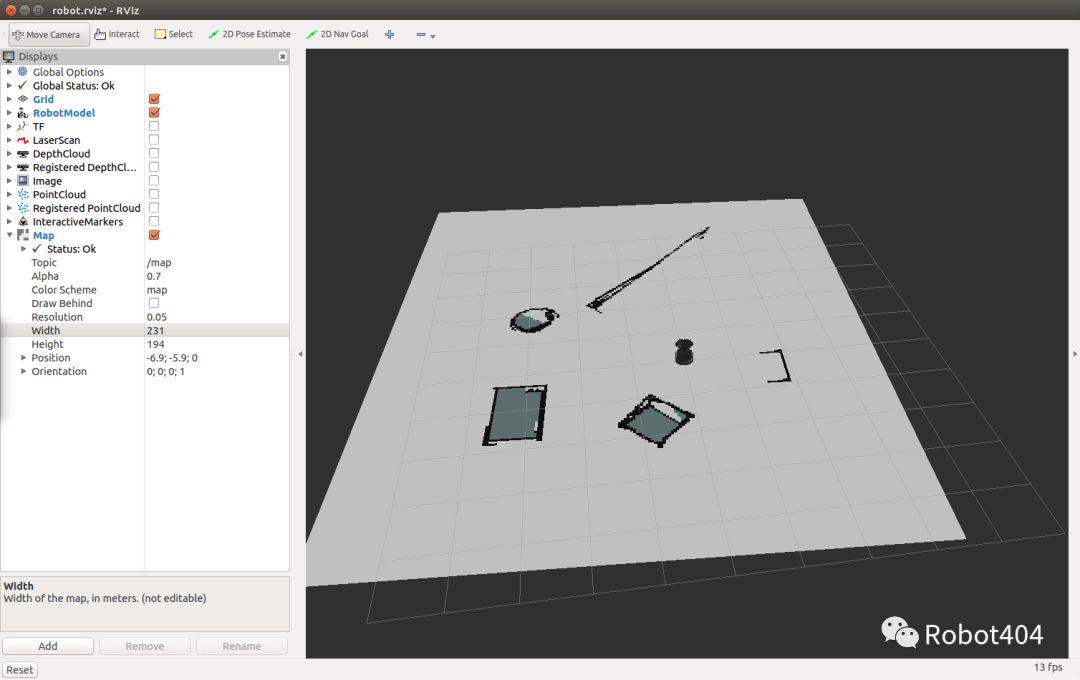
现在我们将加载已有的Turtlebot运动场景地图,使用map_server包中的map_server节点加载已有地图,将地图文件的路径和地图分辨率作为参数(如果未在YAML文件中指定),通过如下launch文件加载Turtlebot运动场景地图并将其显示在rviz中,见图8。关于map_server在下一节进行介绍。
<launch>
   <!-- Run Gazebo with turtlebot -->
   <include file="$(find turtlebot_gazebo)/launch/turtlebot_world.launch"/>

   <!-- Load existing map -->
   <node name="map_server" pkg="map_server" type="map_server" args="$(find turtlebot_gazebo)/maps/playground.yaml" />

   <!-- Open rviz -->
   <include file="$(find turtlebot_rviz_launchers)/launch/view_robot.launch"/>
</launch>
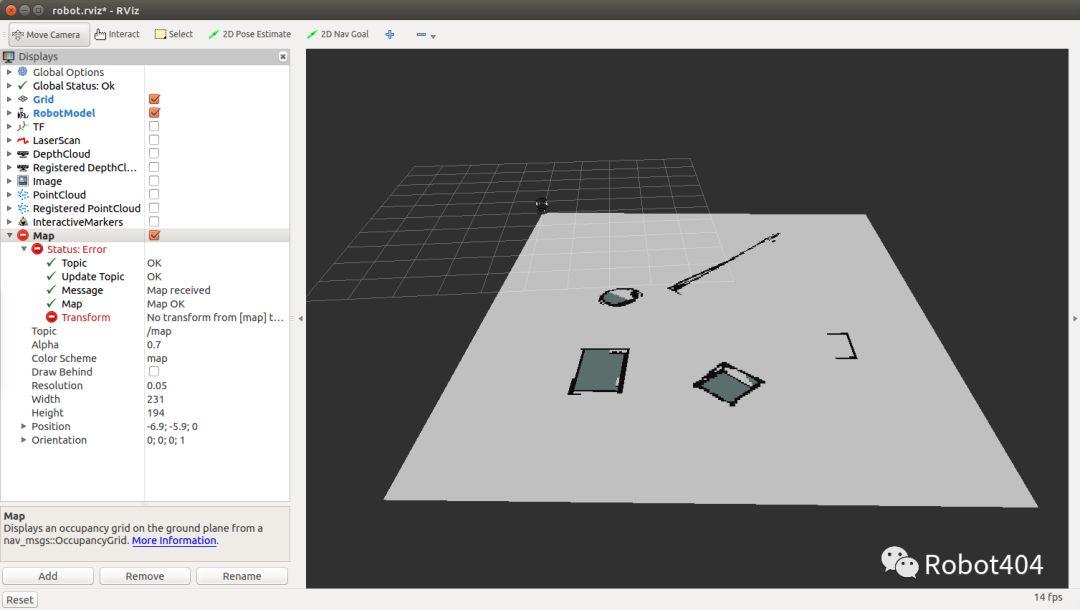
注意,机器人不知道它在地图中的位置,导致rviz未能正确显示其位置;在下一教程中,我们将学习如何向机器人提供此信息;为了解决这个问题,我们将从/map添加一个静态变换到/odom(在下一教程解释),如图9所示。
<launch>
   <!-- Run Gazebo with turtlebot -->
   <include file="$(find turtlebot_gazebo)/launch/turtlebot_world.launch"/>

   <!-- Load existing map -->
   <node name="map_server" pkg="map_server" type="map_server" args="$(find turtlebot_gazebo)/maps/playground.yaml" />

   <!-- Publish a static transformation between /odom and /map -->
  <node name="tf" pkg="tf" type="static_transform_publisher" args="0 0 0 0 0 0 /map /odom 100" />

   <!-- Open rviz -->
   <include file="$(find turtlebot_rviz_launchers)/launch/view_robot.launch"/>
</launch>
1.5.4 ROS 服务
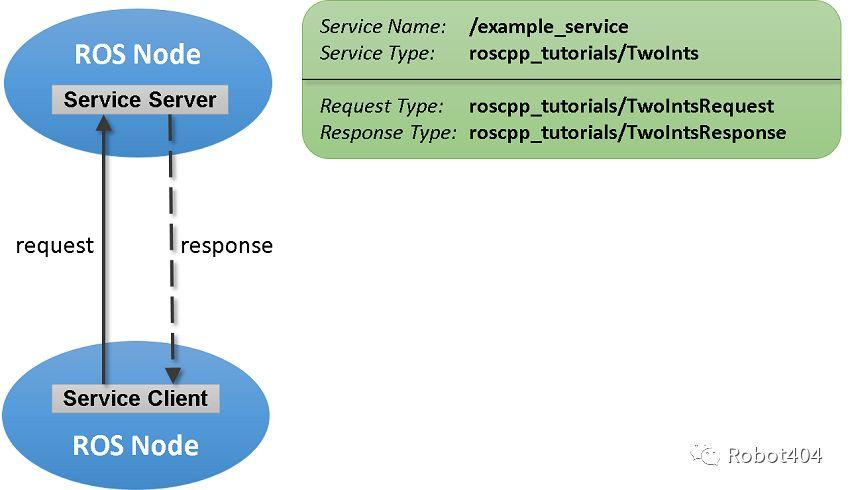
服务只是同步远程过程调用,它们允许一个节点调用在另一个节点中执行的函数。我们定义此函数的输入和输出与我们定义新消息类型的方式类似,服务器(提供服务)指定处理服务请求的回调,并发布该服务;客户端(调用服务)通过本地代理访问此服务,见图10。
(1)使用服务
ros::NodeHandle nh;
ros::ServiceClient client = nh.serviceClient<my_package::Foo>("my_service_name");

my_package::Foo foo;
foo.request.<var> = <value>;
...
if (client.call(foo)) {
    ...
}
如果服务调用成功,则call()将返回true,并且srv.response中的值将有效;如果调用未成功,则call()将返回false,并且srv.response中的值将无效。
(2)map_server
map_server使得你可以保存当前创建的地图或载入已有地图,需要通过如下命令安装:
sudo apt-get install ros-kinetic-map-server
通过如下命令可以保存实时创建的地图到文件:
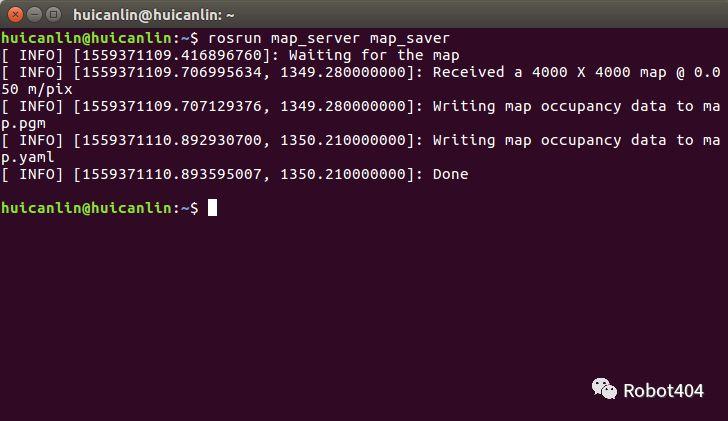
rosrun map_server map_saver [-f mapname]
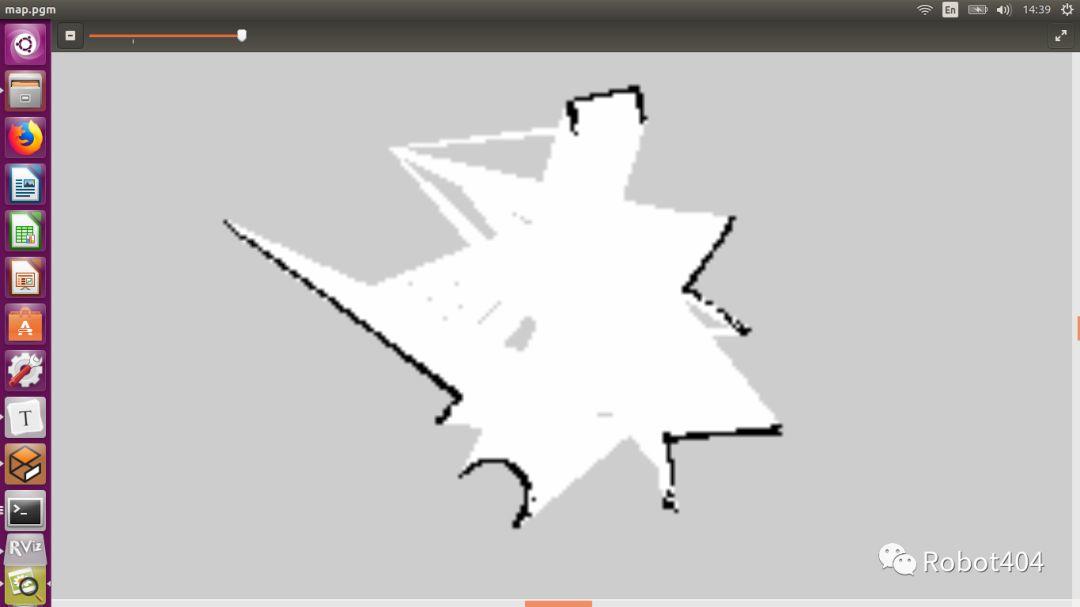
map_server在当前目录生成2个文件:map.pgm——地图本身,map.yaml ——地图的元数据,见图11。
使用Ubuntu默认图像查看程序(eog)打开.pgm文件:
eog map.pgm
接下来,我们学习如何通过代码将地图加载到内存,用于规划机器人的运动路径。为此,我们将使用map_server节点提供的名为static_map的ROS服务。
(3)static_map 服务
调用服务static_map,可在ROS节点中获取OGM,该服务不获取任何参数,并返回nav_msgs/OccupancyGrid类型的消息,该消息由两个主要部分组成:①Map MetaData代表地图的元数据,包含:地图分辨率,以m / cell为单位,width即y轴中的单元格数,height即x轴中的单元格数;②int8 [] data代表地图的数据。
1.5.5 载入地图
(1)用C ++加载地图
#include <ros/ros.h>
#include <nav_msgs/GetMap.h>
#include <vector>

using namespace std;

// grid map
int rows;
int cols;
double mapResolution;
vector<vector<bool> > grid;
bool requestMap(ros::NodeHandle &nh);
void readMap(const nav_msgs::OccupancyGrid& msg);
void printGridToFile();

int main(int argc, char** argv)
{
    ros::init(argc, argv, "mapping");
    ros::NodeHandle nh;
    if (!requestMap(nh))
        exit(-1);
    printGridToFile();
    return 0;
}

bool requestMap(ros::NodeHandle &nh)
{
    nav_msgs::GetMap::Request req;
    nav_msgs::GetMap::Response res;
    while (!ros::service::waitForService("static_map", ros::Duration(3.0))) {
        ROS_INFO("Waiting for service static_map to become available");
    }
    ROS_INFO("Requesting the map...");
    ros::ServiceClient mapClient = nh.serviceClient<nav_msgs::GetMap>("static_map");
    if (mapClient.call(req, res)) {
        readMap(res.map);
        return true;
    }
    else {
        ROS_ERROR("Failed to call map service");
        return false;
    }
}

void readMap(const nav_msgs::OccupancyGrid& map)
{
    ROS_INFO("Received a %d X %d map @ %.3f m/pxn",
             map.info.width,
             map.info.height,
             map.info.resolution);
    rows = map.info.height;
    cols = map.info.width;
    mapResolution = map.info.resolution;

    // Dynamically resize the grid
    grid.resize(rows);
    for (int i = 0; i < rows; i++) {
        grid[i].resize(cols);
    }
    int currCell = 0;
    for (int i = 0; i < rows; i++)  {
        for (int j = 0; j < cols; j++)      {
            if (map.data[currCell] == 0) // unoccupied cell
                grid[i][j] = false;
            else
                grid[i][j] = **true**; // occupied (100) or unknown cell (-1)
            currCell++;
        }
    }
}

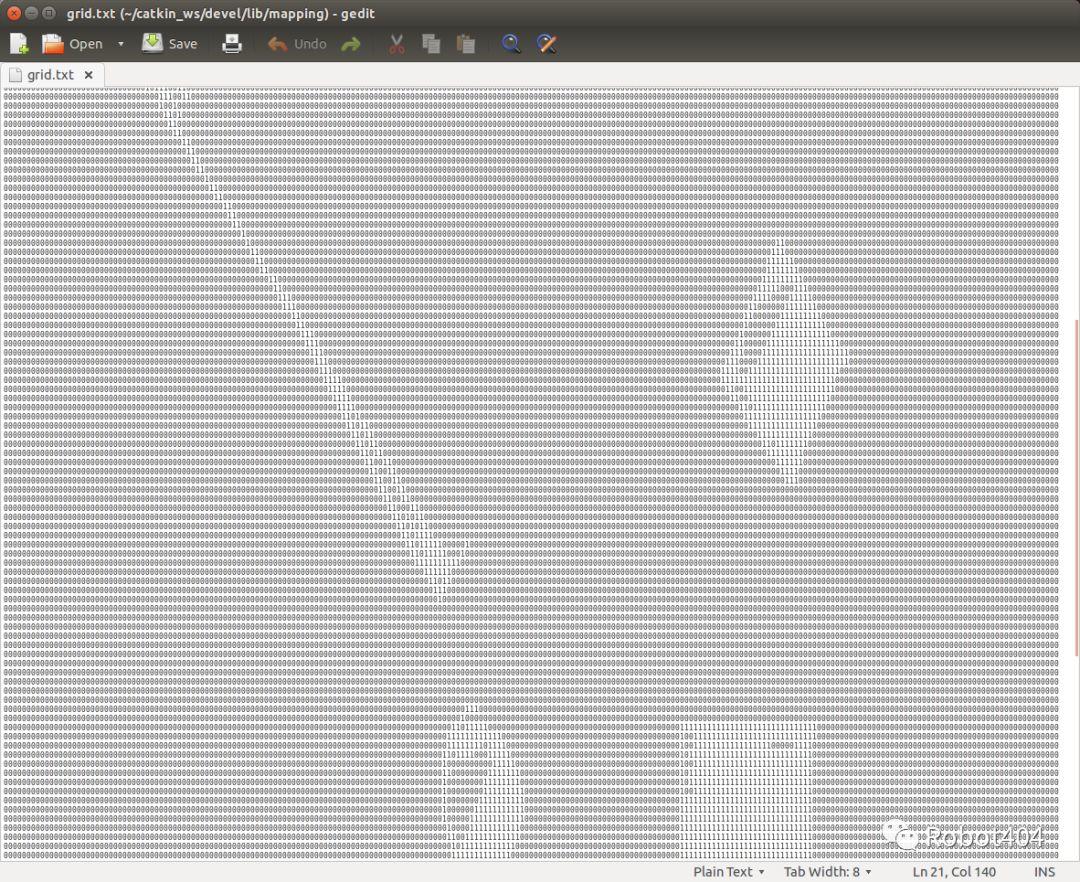
void printGridToFile() {
    ofstream gridFile;
    gridFile.open("grid.txt");
    for (int i = grid.size() - 1; i >= 0; i--) {
        for (int j = 0; j < grid[0].size(); j++) {
            gridFile << (grid[i][j] ? "1" : "0");
        }
        gridFile << endl;
    }
    gridFile.close();
}
(2)Launch文件
<launch>
   <!-- Run Gazebo with turtlebot -->
   <include file="$(find turtlebot_gazebo)/launch/turtlebot_world.launch"/>

   <!-- Load existing map -->
   <node name="map_server" pkg="map_server" type="map_server" args="$(find turtlebot_gazebo)/maps/playground.yaml" />

   <!-- Publish a static transformation between /odom and /map -->
  <node name="tf" pkg="tf" type="static_transform_publisher" args="0 0 0 0 0 0 /map /odom 100" />

   <!-- Open rviz -->
   <include file="$(find turtlebot_rviz_launchers)/launch/view_robot.launch"/>

   <!-- Run load_map node -->
   <node name="load_map" pkg="lecture1-5" type="load_map" output="screen" cwd="node" />
</launch>
(3)输出文件
如果要将输出文件写入运行节点的目录,可以使用<node> tag中的“cwd”属性,默认情况下使用$ ROS_HOME目录。本示例中,grid.txt将写入如下目录:
~/catkin_ws/devel/lib/mapping
(4)载入地图
练习题
(1)从turtlebot_gazebo / maps加载playground.pgm地图到内存中;
(2)膨胀地图中的障碍物,使机器人不会太靠近障碍物;
(3)通过将新地图发布到/ map主题并使用map_saver,将膨胀的地图保存到新文件中。
转自公众号:
Robot404

